
Do you know what is the most popular thing we do with our friends? We exchange our Microsoft Zune and choose whose Zune has more videos and movies, and whose videos and movies are better than other’s. I am always the winner and they want me to share my videos and movies with them. Now I am writing this guide to show you guys how to put your favorite DVD movies and other popular videos on your Microsoft Zune. After doing what I show you, you can become the king of Zune.
Before we start the guide I will share you a really nice Zune DVD/video converter: Aiseesoft DVD to Zune Suite
It is made up by two excellent tools: Aiseesoft DVD to Zune Converter and Aiseesoft Zune Movie Converter
It is very powerful:
For DVD:
It can convert your DVDs and IFOs to Zune, Zune 2 MP4, WMV and Zune supported audio MP3, WMA, and AAC etc.
For Video:
It can convert MPG, MPEG, MPEG2, VOB, MP4, M4V, RM, RMVB, WMV, ASF, MKV, TS, MPV, AVI, 3GP, 3G2, FLV, MPV, MOD, TOD,etc videos to Zune, Zune 2 WMV and MP4 video.
This Zune tool also allows you to do Trim, Crop, adjust video effect and choose audio track and subtitle. You can also merge several files into one output file.
Part 1.
OK, Let’s start with converting DVD to your Zune.
Step 1. Run Aiseesoft DVD to Zune Suite and choose DVD to Zune Converter.
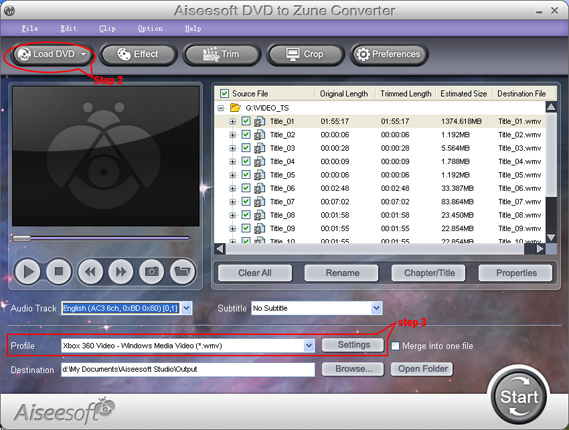
Step 2. Load DVD
Put your DVD in your DVD Drive and click “Load DVD” to load your DVD to the software. You can also load DVD folder and IFO file.
Step 3. Output profile and settings
Choose the profile from the profile list and customize your own video settings by clicking the “settings” button.
Video Editing Steps:
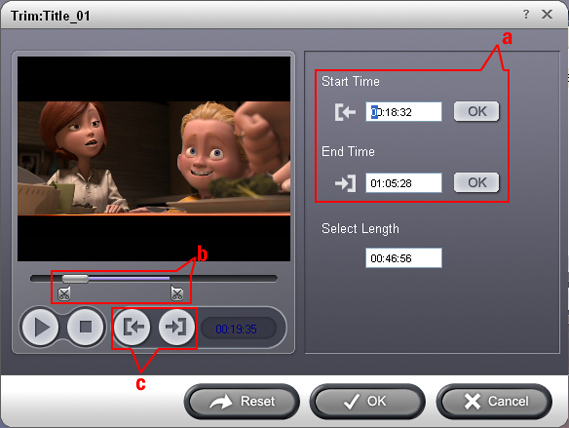
Trim:
You can choose any title or chapter you like to convert. You can do it in 3 ways.
a. Enter the start/end time in the Start Time box and click OK.
b. Drag the scissors bars under the preview window when you want to trim, then the time will be shown in the Start Time box and End Time box for your reference.
c. Click "Trim From" button when you want to begin your trimming and click “Trim to” button when you want to end.
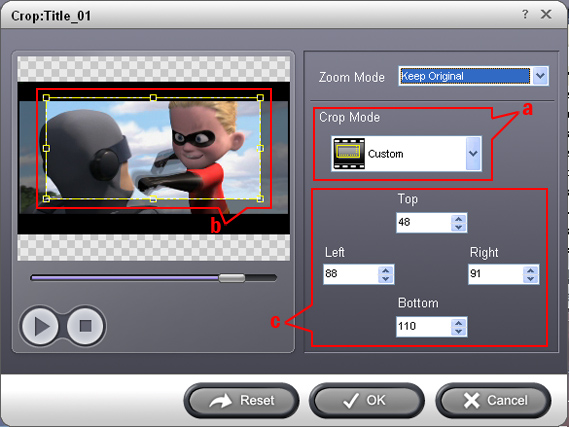
Crop
Also 3 ways to do crop.
a. Crop by selecting a crop mode
b. Crop by adjusting the crop frame
c. Crop by setting the crop values
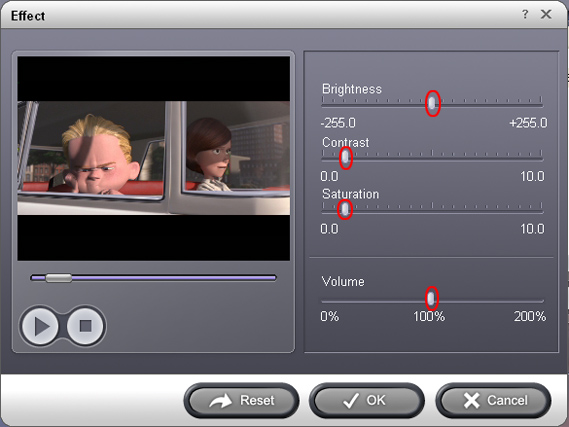
Effect
Adjust your output video’s effect by draging the bar of Brightness, Contrast, Saturation and Volume.
OK, just click the “Start” button to start your conversion and after few mins you can enjoy your DVD movies on your Zune.
Part 2. Convert videos to your Microsoft Zune.
Step 1. Add File
Click “Add File” button to load your videos on your computer.
Step 2. Output profile and settings
Choose a profile according to your Zune from the profile list and specific your settings by clicking “settings” button.
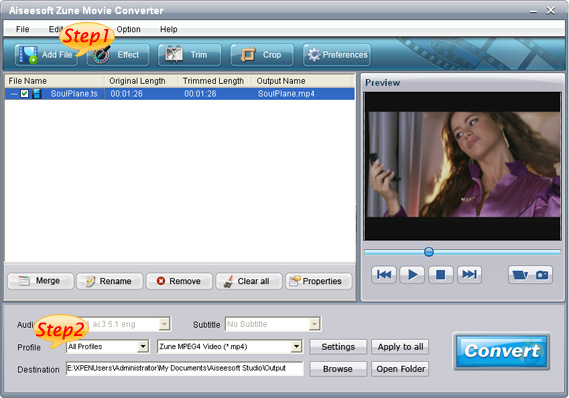
You can start the conversion now, if you want to edit your output video you can do it in the same way of Part 1.
5:["$","$4",null,{"fallback":[[["$","link","css:/assets/_layout-BzYdn0f6.css",{"rel":"stylesheet","precedence":"vite-rsc/importer-resources","href":"/assets/_layout-BzYdn0f6.css","data-rsc-css-href":"/assets/_layout-BzYdn0f6.css"}],"$undefined"],["$","div",null,{"className":"flex justify-center items-center p-8","children":["$","div",null,{"className":"animate-spin rounded-full h-8 w-8 border-b-2 border-indigo-600"}]}]],"children":["$","div",null,{"className":"bg-white/95 mt-0.5 py-6 sm:py-12","children":["$","article",null,{"className":"mx-auto w-full max-w-2xl format format-sm sm:format-base lg:format-lg format-blue dark:format-invert","children":[["$","header",null,{"className":"mb-4 lg:mb-6 not-format","children":[["$","h1",null,{"className":"mb-4 text-3xl font-extrabold leading-tight text-gray-900 lg:mb-6 lg:text-4xl dark:text-white","children":"How to convert dvd and video to zune format"}],["$","address",null,{"className":"flex items-center mb-6 not-italic","children":["$","div",null,{"className":"inline-flex items-center text-sm text-gray-900 dark:text-white","children":[["$","img",null,{"className":"mr-3 w-8 h-8 rounded-full","src":"$7","alt":"ailisaone"}],["$","a",null,{"href":"/author/ailisaone_73462714466710","rel":"author","className":"font-bold capitalize hover:underline dark:text-white","children":"ailisaone"}],["$","span",null,{"className":"mx-1 text-md text-gray-400 dark:text-gray-500","children":"·"}],["$","span",null,{"className":"inline-flex items-center ml-1 text-gray-500 dark:text-gray-400","children":"3 min read"}],["$","span",null,{"className":"mx-1 text-md text-gray-400 dark:text-gray-500","children":"·"}],["$","time",null,{"dateTime":"Mon Feb 16 2009","className":"text-gray-500 dark:text-gray-400","children":"Feb 16, 2009"}],[["$","span",null,{"className":"mx-1 text-md text-gray-400 dark:text-gray-500","children":"·"}],["$","a","general-discussion",{"href":"/t/general-discussion","className":"capitalize text-sm text-gray-500 dark:text-gray-400 hover:text-gray-600","children":"general discussion"}]]]}]}]]}],["$","div",null,{"className":"lead prose mt-4 text-lg leading-8 text-gray-600","children":["$","div",null,{"dangerouslySetInnerHTML":{"__html":"$8"}}]}],"$L9","$La"]}]}]}] b:T63b,M12.315 2c2.43 0 2.784.013 3.808.06 1.064.049 1.791.218 2.427.465a4.902 4.902 0 011.772 1.153 4.902 4.902 0 011.153 1.772c.247.636.416 1.363.465 2.427.048 1.067.06 1.407.06 4.123v.08c0 2.643-.012 2.987-.06 4.043-.049 1.064-.218 1.791-.465 2.427a4.902 4.902 0 01-1.153 1.772 4.902 4.902 0 01-1.772 1.153c-.636.247-1.363.416-2.427.465-1.067.048-1.407.06-4.123.06h-.08c-2.643 0-2.987-.012-4.043-.06-1.064-.049-1.791-.218-2.427-.465a4.902 4.902 0 01-1.772-1.153 4.902 4.902 0 01-1.153-1.772c-.247-.636-.416-1.363-.465-2.427-.047-1.024-.06-1.379-.06-3.808v-.63c0-2.43.013-2.784.06-3.808.049-1.064.218-1.791.465-2.427a4.902 4.902 0 011.153-1.772A4.902 4.902 0 015.45 2.525c.636-.247 1.363-.416 2.427-.465C8.901 2.013 9.256 2 11.685 2h.63zm-.081 1.802h-.468c-2.456 0-2.784.011-3.807.058-.975.045-1.504.207-1.857.344-.467.182-.8.398-1.15.748-.35.35-.566.683-.748 1.15-.137.353-.3.882-.344 1.857-.047 1.023-.058 1.351-.058 3.807v.468c0 2.456.011 2.784.058 3.807.045.975.207 1.504.344 1.857.182.466.399.8.748 1.15.35.35.683.566 1.15.748.353.137.882.3 1.857.344 1.054.048 1.37.058 4.041.058h.08c2.597 0 2.917-.01 3.96-.058.976-.045 1.505-.207 1.858-.344.466-.182.8-.398 1.15-.748.35-.35.566-.683.748-1.15.137-.353.3-.882.344-1.857.048-1.055.058-1.37.058-4.041v-.08c0-2.597-.01-2.917-.058-3.96-.045-.976-.207-1.505-.344-1.858a3.097 3.097 0 00-.748-1.15 3.098 3.098 0 00-1.15-.748c-.353-.137-.882-.3-1.857-.344-1.023-.047-1.351-.058-3.807-.058zM12 6.865a5.135 5.135 0 110 10.27 5.135 5.135 0 010-10.27zm0 1.802a3.333 3.333 0 100 6.666 3.333 3.333 0 000-6.666zm5.338-3.205a1.2 1.2 0 110 2.4 1.2 1.2 0 010-2.4z6:["$","footer",null,{"className":"bg-gray-900 dark:bg-gray-900","children":["$","div",null,{"className":"mx-auto max-w-7xl px-6 py-4.5 md:flex md:items-center md:justify-between lg:px-8","children":[["$","div",null,{"className":"flex justify-center space-x-6 md:order-2","children":[["$","a","Facebook",{"href":"https://facebook.com/gleeztech","target":"_blank","rel":"noopener noreferrer","className":"text-gray-400 hover:text-gray-500","children":[["$","span",null,{"className":"sr-only","children":"Facebook"}],["$","svg",null,{"className":"h-6 w-6","fill":"currentColor","viewBox":"0 0 24 24","aria-hidden":"true","children":["$","path",null,{"fillRule":"evenodd","d":"M22 12c0-5.523-4.477-10-10-10S2 6.477 2 12c0 4.991 3.657 9.128 8.438 9.878v-6.987h-2.54V12h2.54V9.797c0-2.506 1.492-3.89 3.777-3.89 1.094 0 2.238.195 2.238.195v2.46h-1.26c-1.243 0-1.63.771-1.63 1.562V12h2.773l-.443 2.89h-2.33v6.988C18.343 21.128 22 16.991 22 12z","clipRule":"evenodd"}]}]]}],["$","a","Instagram",{"href":"https://instagram.com/gleeztech","target":"_blank","rel":"noopener noreferrer","className":"text-gray-400 hover:text-gray-500","children":[["$","span",null,{"className":"sr-only","children":"Instagram"}],["$","svg",null,{"className":"h-6 w-6","fill":"currentColor","viewBox":"0 0 24 24","aria-hidden":"true","children":["$","path",null,{"fillRule":"evenodd","d":"$b","clipRule":"evenodd"}]}]]}],["$","a","X",{"href":"https://x.com/gleeztech","target":"_blank","rel":"noopener noreferrer","className":"text-gray-400 hover:text-gray-500","children":[["$","span",null,{"className":"sr-only","children":"X"}],["$","svg",null,{"className":"h-6 w-6","fill":"currentColor","viewBox":"0 0 24 24","aria-hidden":"true","children":["$","path",null,{"d":"M13.6823 10.6218L20.2391 3H18.6854L12.9921 9.61788L8.44486 3H3.2002L10.0765 13.0074L3.2002 21H4.75404L10.7663 14.0113L15.5685 21H20.8131L13.6819 10.6218H13.6823ZM11.5541 13.0956L10.8574 12.0991L5.31391 4.16971H7.70053L12.1742 10.5689L12.8709 11.5655L18.6861 19.8835H16.2995L11.5541 13.096V13.0956Z"}]}]]}],"$Lc"]}],"$Ld"]}]}] 9:null a:["$","$4",null,{"fallback":["$","div",null,{"className":"comments-skeleton","children":[["$","div",null,{"className":"h-6 bg-gray-200 rounded w-32 mb-4 animate-pulse"}],["$","div",null,{"className":"space-y-3","children":[["$","div","1",{"className":"h-16 bg-gray-100 rounded animate-pulse"}],["$","div","2",{"className":"h-16 bg-gray-100 rounded animate-pulse"}],["$","div","3",{"className":"h-16 bg-gray-100 rounded animate-pulse"}]]}]]}],"children":"$Le"}] c:["$","a","GitHub",{"href":"https://github.com/gleez","target":"_blank","rel":"noopener noreferrer","className":"text-gray-400 hover:text-gray-500","children":[["$","span",null,{"className":"sr-only","children":"GitHub"}],["$","svg",null,{"className":"h-6 w-6","fill":"currentColor","viewBox":"0 0 24 24","aria-hidden":"true","children":["$","path",null,{"fillRule":"evenodd","d":"M12 2C6.477 2 2 6.484 2 12.017c0 4.425 2.865 8.18 6.839 9.504.5.092.682-.217.682-.483 0-.237-.008-.868-.013-1.703-2.782.605-3.369-1.343-3.369-1.343-.454-1.158-1.11-1.466-1.11-1.466-.908-.62.069-.608.069-.608 1.003.07 1.531 1.032 1.531 1.032.892 1.53 2.341 1.088 2.91.832.092-.647.35-1.088.636-1.338-2.22-.253-4.555-1.113-4.555-4.951 0-1.093.39-1.988 1.029-2.688-.103-.253-.446-1.272.098-2.65 0 0 .84-.27 2.75 1.026A9.564 9.564 0 0112 6.844c.85.004 1.705.115 2.504.337 1.909-1.296 2.747-1.027 2.747-1.027.546 1.379.202 2.398.1 2.651.64.7 1.028 1.595 1.028 2.688 0 3.848-2.339 4.695-4.566 4.943.359.309.678.92.678 1.855 0 1.338-.012 2.419-.012 2.747 0 .268.18.58.688.482A10.019 10.019 0 0022 12.017C22 6.484 17.522 2 12 2z","clipRule":"evenodd"}]}]]}] d:["$","div",null,{"className":"mt-8 md:order-1 md:mt-0","children":["$","p",null,{"className":"text-sm leading-5 text-gray-400","children":["© 2005 - ",2026," Gleez Inc. All rights reserved."]}]}] f:T417,data:image/svg+xml;utf8,%3Csvg%20width%3D%2232%22%20height%3D%2232%22%20viewBox%3D%220%200%2032%2032%22%20%0A%20%20%20%20%20%20%20%20%20xmlns%3D%22http%3A%2F%2Fwww.w3.org%2F2000%2Fsvg%22%20role%3D%22img%22%20aria-label%3D%22Avatar%20for%20tina%20smith%22%3E%0A%20%20%20%20%20%20%3Crect%20width%3D%22100%25%22%20height%3D%22100%25%22%20fill%3D%22hsl(333%2C%2067%25%2C%2047%25)%22%20rx%3D%223.2%22%20%2F%3E%0A%20%20%20%20%20%20%3Ctext%20x%3D%2250%25%22%20y%3D%2250%25%22%20%0A%20%20%20%20%20%20%20%20%20%20%20%20font-family%3D%22sans-serif%22%20%0A%20%20%20%20%20%20%20%20%20%20%20%20font-size%3D%2212.8%22%20%0A%20%20%20%20%20%20%20%20%20%20%20%20font-weight%3D%22bold%22%20%0A%20%20%20%20%20%20%20%20%20%20%20%20fill%3D%22%23FFFFFF%22%20%0A%20%20%20%20%20%20%20%20%20%20%20%20text-anchor%3D%22middle%22%20%0A%20%20%20%20%20%20%20%20%20%20%20%20dominant-baseline%3D%22central%22%0A%20%20%20%20%20%20%20%20%20%20%20%20style%3D%22user-select%3A%20none%3B%22%3E%0A%20%20%20%20%20%20%20%20TS%0A%20%20%20%20%20%20%3C%2Ftext%3E%0A%20%20%20%20%3C%2Fsvg%3E10:T40f,data:image/svg+xml;utf8,%3Csvg%20width%3D%2232%22%20height%3D%2232%22%20viewBox%3D%220%200%2032%2032%22%20%0A%20%20%20%20%20%20%20%20%20xmlns%3D%22http%3A%2F%2Fwww.w3.org%2F2000%2Fsvg%22%20role%3D%22img%22%20aria-label%3D%22Avatar%20for%20Guest%22%3E%0A%20%20%20%20%20%20%3Crect%20width%3D%22100%25%22%20height%3D%22100%25%22%20fill%3D%22hsl(280%2C%2080%25%2C%2050%25)%22%20rx%3D%223.2%22%20%2F%3E%0A%20%20%20%20%20%20%3Ctext%20x%3D%2250%25%22%20y%3D%2250%25%22%20%0A%20%20%20%20%20%20%20%20%20%20%20%20font-family%3D%22sans-serif%22%20%0A%20%20%20%20%20%20%20%20%20%20%20%20font-size%3D%2212.8%22%20%0A%20%20%20%20%20%20%20%20%20%20%20%20font-weight%3D%22bold%22%20%0A%20%20%20%20%20%20%20%20%20%20%20%20fill%3D%22%23FFFFFF%22%20%0A%20%20%20%20%20%20%20%20%20%20%20%20text-anchor%3D%22middle%22%20%0A%20%20%20%20%20%20%20%20%20%20%20%20dominant-baseline%3D%22central%22%0A%20%20%20%20%20%20%20%20%20%20%20%20style%3D%22user-select%3A%20none%3B%22%3E%0A%20%20%20%20%20%20%20%20G%0A%20%20%20%20%20%20%3C%2Ftext%3E%0A%20%20%20%20%3C%2Fsvg%3Ee:["$","div",null,{"className":"mt-8","children":[["$","h3",null,{"className":"text-xl font-semibold mb-4","children":["Voices (",2,")"]}],["$","div",null,{"className":"space-y-6","children":[[["$","div","78830635057558",{"className":"border-l-4 border-gray-200 pl-4","children":[["$","div",null,{"className":"flex items-center gap-2 mb-2","children":["$","address",null,{"className":"flex items-center mb-6 not-italic","children":["$","div",null,{"className":"inline-flex items-center text-sm text-gray-900 dark:text-white","children":[["$","img",null,{"className":"mr-3 w-8 h-8 rounded-full","src":"$f","alt":"tina smith"}],["$","a",null,{"href":"/author/tina_smith_73521350836630","rel":"author","className":"font-bold capitalize hover:underline dark:text-white","children":"tina smith"}],["$","span",null,{"className":"mx-1 text-md text-gray-400 dark:text-gray-500","children":"·"}],"$undefined",["$","span",null,{"className":"mx-1 text-md text-gray-400 dark:text-gray-500","children":"·"}],["$","time",null,{"dateTime":"Fri Aug 28 2009","className":"text-gray-500 dark:text-gray-400","children":"Aug 28, 2009"}],"$undefined"]}]}]}],["$","p",null,{"className":"text-gray-700","children":"up up everyone\nup up: up up everyone\nup up everyone"}],["$","div",null,{"className":"flex items-center mt-4 space-x-4","children":["$","button",null,{"type":"button","className":"flex items-center font-medium text-sm text-gray-500 hover:underline dark:text-gray-400","children":[["$","svg",null,{"className":"mr-1.5 w-3 h-3","aria-hidden":"true","xmlns":"http://www.w3.org/2000/svg","fill":"currentColor","viewBox":"0 0 20 18","children":["$","path",null,{"d":"M18 0H2a2 2 0 0 0-2 2v9a2 2 0 0 0 2 2h2v4a1 1 0 0 0 1.707.707L10.414 13H18a2 2 0 0 0 2-2V2a2 2 0 0 0-2-2Zm-5 4h2a1 1 0 1 1 0 2h-2a1 1 0 1 1 0-2ZM5 4h5a1 1 0 1 1 0 2H5a1 1 0 0 1 0-2Zm2 5H5a1 1 0 0 1 0-2h2a1 1 0 0 1 0 2Zm9 0h-6a1 1 0 0 1 0-2h6a1 1 0 1 1 0 2Z"}]}],"Reply"]}]}]]}],["$","div","78791309263254",{"className":"border-l-4 border-gray-200 pl-4","children":[["$","div",null,{"className":"flex items-center gap-2 mb-2","children":["$","address",null,{"className":"flex items-center mb-6 not-italic","children":["$","div",null,{"className":"inline-flex items-center text-sm text-gray-900 dark:text-white","children":[["$","img",null,{"className":"mr-3 w-8 h-8 rounded-full","src":"$10","alt":"Guest"}],"$L11","$L12","$undefined","$L13","$L14","$undefined"]}]}]}],"$L15","$L16"]}]],false]}]]}] 11:["$","a",null,{"href":"/author/guest_73325980156310","rel":"author","className":"font-bold capitalize hover:underline dark:text-white","children":"Guest"}] 12:["$","span",null,{"className":"mx-1 text-md text-gray-400 dark:text-gray-500","children":"·"}] 13:["$","span",null,{"className":"mx-1 text-md text-gray-400 dark:text-gray-500","children":"·"}] 14:["$","time",null,{"dateTime":"Sun Jul 26 2009","className":"text-gray-500 dark:text-gray-400","children":"Jul 26, 2009"}] 15:["$","p",null,{"className":"text-gray-700","children":"well, i have never seen such: well, i have never seen such a professional tool , great one"}] 16:["$","div",null,{"className":"flex items-center mt-4 space-x-4","children":["$","button",null,{"type":"button","className":"flex items-center font-medium text-sm text-gray-500 hover:underline dark:text-gray-400","children":[["$","svg",null,{"className":"mr-1.5 w-3 h-3","aria-hidden":"true","xmlns":"http://www.w3.org/2000/svg","fill":"currentColor","viewBox":"0 0 20 18","children":["$","path",null,{"d":"M18 0H2a2 2 0 0 0-2 2v9a2 2 0 0 0 2 2h2v4a1 1 0 0 0 1.707.707L10.414 13H18a2 2 0 0 0 2-2V2a2 2 0 0 0-2-2Zm-5 4h2a1 1 0 1 1 0 2h-2a1 1 0 1 1 0-2ZM5 4h5a1 1 0 1 1 0 2H5a1 1 0 0 1 0-2Zm2 5H5a1 1 0 0 1 0-2h2a1 1 0 0 1 0 2Zm9 0h-6a1 1 0 0 1 0-2h6a1 1 0 1 1 0 2Z"}]}],"Reply"]}]}]