0:{"root":[["$","meta","1",{"property":"csp-nonce","nonce":"ad372546-0cac-47a8-9b37-e706bd458811"}],"$L1"],"formState":"$undefined","returnValue":"$undefined"}
2:"$Sreact.fragment"
3:I["7ada5cab5be8",[],"Header",1]
4:"$Sreact.suspense"
:HL["/assets/_layout-BzYdn0f6.css","stylesheet"]
1:["$","$2","2",{"children":[[["$","link","css:/assets/_layout-BzYdn0f6.css",{"rel":"stylesheet","precedence":"vite-rsc/importer-resources","href":"/assets/_layout-BzYdn0f6.css","data-rsc-css-href":"/assets/_layout-BzYdn0f6.css"}],"$undefined"],["$","html",null,{"lang":"en","className":"$undefined","children":[["$","head",null,{"children":[["$","meta",null,{"charSet":"UTF-8"}],["$","meta",null,{"name":"viewport","content":"width=device-width, initial-scale=1.0"}],["$","link",null,{"rel":"icon","type":"image/png","href":"/static/icons/apple-icon.png"}],["$","link",null,{"rel":"icon","type":"image/png","sizes":"32x32","href":"/static/icons/favicon-32x32.png"}],["$","link",null,{"rel":"apple-touch-icon","href":"/static/icons/apple-icon.png"}],["$","meta",null,{"name":"theme-color","content":"#1e40af"}],["$","meta",null,{"name":"language","content":"en_US"}],["$","meta",null,{"httpEquiv":"content-language","content":"en_US"}]]}],["$","body",null,{"className":"min-h-screen flex flex-col","children":[["$","$L3",null,{}],["$","main",null,{"className":"main-content grow bg-gray-100","children":["$","$4",null,{"fallback":[[["$","link","css:/assets/_layout-BzYdn0f6.css",{"rel":"stylesheet","precedence":"vite-rsc/importer-resources","href":"/assets/_layout-BzYdn0f6.css","data-rsc-css-href":"/assets/_layout-BzYdn0f6.css"}],"$undefined"],["$","div",null,{"className":"flex justify-center items-center p-8","children":["$","div",null,{"className":"animate-spin rounded-full h-8 w-8 border-b-2 border-indigo-600"}]}]],"children":[[["$","title",null,{"children":"How to Put DVDVideo on iPod PSP Computer Zune Xbox MacWindows | Gleez"}],["$","meta",null,{"name":"description","content":"Many Mac users have iPod, PSP and other portable devices, but they can only enjoy songs and videos from iTunes or buy them from internet, because there is…"}],["$","meta",null,{"name":"keywords","content":"how, put, dvdvideo, ipod, psp, computer, zune, xbox, macwindows, Gleez, privacy, secure productivity"}],["$","meta",null,{"name":"author","content":"ailisaone"}],["$","meta",null,{"property":"og:title","content":"How to Put DVDVideo on iPod PSP Computer Zune Xbox MacWindows | Gleez"}],["$","meta",null,{"property":"og:description","content":"Many Mac users have iPod, PSP and other portable devices, but they can only enjoy songs and videos from iTunes or buy them from internet, because there is…"}],["$","meta",null,{"property":"og:type","content":"article"}],["$","meta",null,{"property":"og:url","content":"https://gleez.com/s/how-to-put-dvd-video-on-ipod-psp-computer-zune-xbox-mac-windows"}],["$","meta",null,{"property":"og:image","content":"/static/og.png"}],["$","meta",null,{"property":"og:image:alt","content":"How to Put DVDVideo on iPod PSP Computer Zune Xbox MacWindows"}],["$","meta",null,{"property":"og:site_name","content":"Gleez"}],["$","meta",null,{"property":"og:locale","content":"en_US"}],["$","meta",null,{"property":"article:published_time","content":"2009-02-05T01:34:55.000Z"}],["$","meta",null,{"property":"article:modified_time","content":"2018-12-31T17:59:33.000Z"}],["$","meta",null,{"property":"article:author","content":"https://gleez.com/author/73462714466710"}],[],["$","meta",null,{"name":"twitter:card","content":"summary_large_image"}],["$","meta",null,{"name":"twitter:title","content":"How to Put DVDVideo on iPod PSP Computer Zune Xbox MacWindows | Gleez"}],["$","meta",null,{"name":"twitter:description","content":"Many Mac users have iPod, PSP and other portable devices, but they can only enjoy songs and videos from iTunes or buy them from internet, because there is…"}],["$","meta",null,{"name":"twitter:image","content":"/static/og.png"}],["$","meta",null,{"name":"twitter:image:alt","content":"How to Put DVDVideo on iPod PSP Computer Zune Xbox MacWindows"}],["$","meta",null,{"name":"twitter:site","content":"@gleeztech"}],["$","meta",null,{"name":"twitter:creator","content":"@gleeztech"}],["$","link",null,{"rel":"canonical","href":"https://gleez.com/s/how-to-put-dvd-video-on-ipod-psp-computer-zune-xbox-mac-windows"}],["$","meta",null,{"name":"robots","content":"index, follow"}],["$","meta",null,{"name":"googlebot","content":"index, follow, max-snippet:-1, max-image-preview:large"}],"$L5"],"$L6"]}]}],"$L7"]}]]}]]}]
5:["$","script",null,{"type":"application/ld+json","dangerouslySetInnerHTML":{"__html":"{\"@context\":\"https://schema.org\",\"@type\":\"BlogPosting\",\"headline\":\"How to Put DVDVideo on iPod PSP Computer Zune Xbox MacWindows\",\"description\":\"Many Mac users have iPod, PSP and other portable devices, but they can only enjoy songs and videos from iTunes or buy them from internet, because there is…\",\"image\":\"/static/og.png\",\"author\":{\"@type\":\"Person\",\"name\":\"ailisaone\"},\"publisher\":{\"@type\":\"Organization\",\"name\":\"Gleez\",\"logo\":{\"@type\":\"ImageObject\",\"url\":\"https://gleez.tech/static/logo-512.png\"}},\"datePublished\":\"2009-02-05T01:34:55.000Z\",\"dateModified\":\"2018-12-31T17:59:33.000Z\",\"mainEntityOfPage\":{\"@type\":\"WebPage\",\"@id\":\"https://gleez.com/s/how-to-put-dvd-video-on-ipod-psp-computer-zune-xbox-mac-windows\"}}"}}]
8:T413,data:image/svg+xml;utf8,%3Csvg%20width%3D%2232%22%20height%3D%2232%22%20viewBox%3D%220%200%2032%2032%22%20%0A%20%20%20%20%20%20%20%20%20xmlns%3D%22http%3A%2F%2Fwww.w3.org%2F2000%2Fsvg%22%20role%3D%22img%22%20aria-label%3D%22Avatar%20for%20ailisaone%22%3E%0A%20%20%20%20%20%20%3Crect%20width%3D%22100%25%22%20height%3D%22100%25%22%20fill%3D%22hsl(147%2C%2082%25%2C%2057%25)%22%20rx%3D%223.2%22%20%2F%3E%0A%20%20%20%20%20%20%3Ctext%20x%3D%2250%25%22%20y%3D%2250%25%22%20%0A%20%20%20%20%20%20%20%20%20%20%20%20font-family%3D%22sans-serif%22%20%0A%20%20%20%20%20%20%20%20%20%20%20%20font-size%3D%2212.8%22%20%0A%20%20%20%20%20%20%20%20%20%20%20%20font-weight%3D%22bold%22%20%0A%20%20%20%20%20%20%20%20%20%20%20%20fill%3D%22%23FFFFFF%22%20%0A%20%20%20%20%20%20%20%20%20%20%20%20text-anchor%3D%22middle%22%20%0A%20%20%20%20%20%20%20%20%20%20%20%20dominant-baseline%3D%22central%22%0A%20%20%20%20%20%20%20%20%20%20%20%20style%3D%22user-select%3A%20none%3B%22%3E%0A%20%20%20%20%20%20%20%20A%0A%20%20%20%20%20%20%3C%2Ftext%3E%0A%20%20%20%20%3C%2Fsvg%3E9:T121d,Many Mac users have iPod, PSP and other portable devices, but they can only enjoy songs and videos from iTunes or buy them from internet, because there is seldom nice Mac DVD and Video covnerter for iPod, PSP and other devices. Today I will introduce you an excellent DVD/Video converter for Mac: Aiseesoft DVD Converter Suite for Mac It allows you to put your own DVDs and you own videos on your iPod, PSP, Mac Computer and other players on Mac.
This article aims to show you how to put your DVDs and videos on your iPod, PSP, Computer, Zune, Xbox and other players for Mac users.
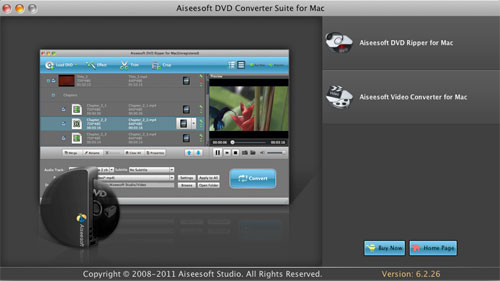
Part 1. Convert DVD for Mac
Step 1. Download and install Aiseesoft DVD Converter Suite.
Step 2. Load DVD
Insert DVD into your DVD-ROM, run DVD Ripper for Mac, click “Load DVD”, find the DVD folder of the movie you want to add from your DVD-ROM, and Click “Open”.
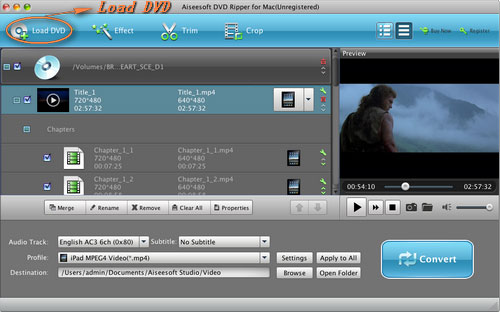
Step 3. Set output format.
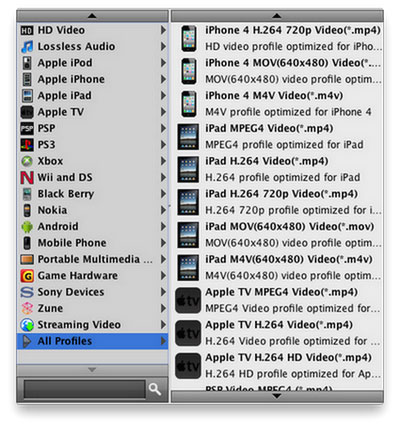
This best DVD ripper for Mac provides you output formats as many as you want. Just choose one from the drop down list “profile” according to your portable player.
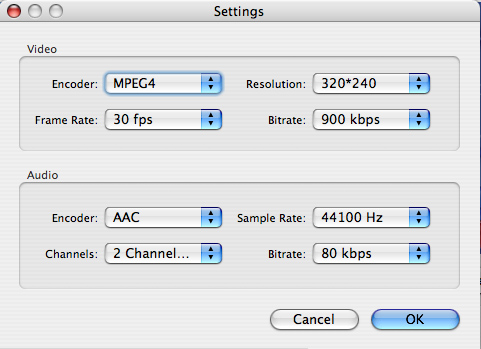
If you are very professional with your player, you can also set your output parameter values such as Resolution, Frame Rate, Bitrate and Sample Rate and so on.
Tips:
- Trim:
If you want to rip only a part of the DVD movie, please click “Trim” button and drag the “Start trim slider” to set the start time and “End trim slider” to set the end time. (a). You can also do that by clicking the “Start trim button” and “End trim button”(b). The third way you do that is set the exact Start/End time at the right of the pop-up window and click “OK”.

-
Crop:
If you want to remove the black edges or you want to rip a certain area of your video, please click the “Crop” button. You can do this either by drag the frame around the movie (a) or set the crop value: “Top, Left, Bottom, Right”.(b). Another way to do that is choose mode from “Crop Mode”(c).
DVD Ripper for Mac also allows you to choose the output aspect ratio above the crop panel, “Keep Original, full screen, 16:9 and 4:3” are available.
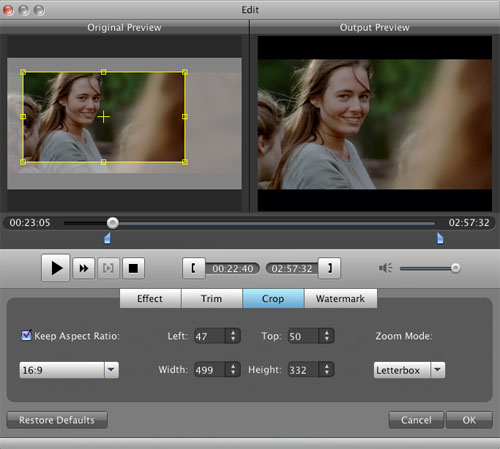
-
Effect:
If you want to adjust the effect of your movie, please click the “Effect” button and a pop-up effect window will appear. It allows you to edit your movie’s effect including “Brightness, Contrast, Hue, Saturation and Volume”.
Click “Start” to begin your conversion.
Part 2. Convert videos for Mac
Step 1. Choose “Video Converter for Mac” on the main interface.
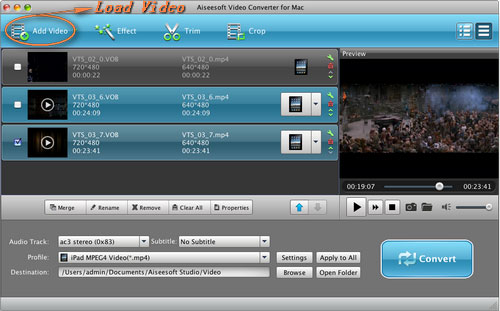
Step 2. Add video
Click “Add File” to load your video that you want to put.
Step 3. Choose output profile and settings.
You can choose your output format from the drop down list and you can set the exact values of your output videos, such as Resolution, Frame Rate and so on.
You can do the video editing as the same way of convert DVDs.
After getting your satisfying video, then click “Start” button to start your conversion.
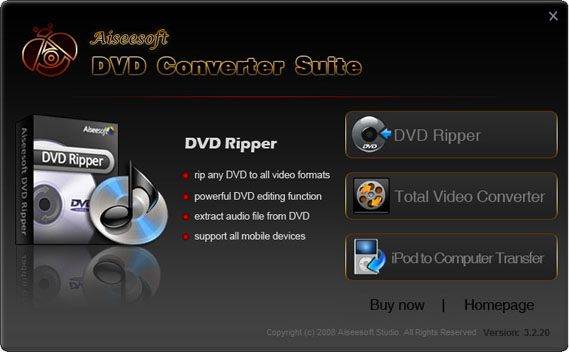
If you are a window user, Aiseesoft DVD Converter Suite is your best choice.
It is the perfect combination of Aiseesoft DVD Ripper, Aiseesoft Total Video Converter and Aiseesoft iPod to Computer Transfer. With this powerful DVD Converter Suite, you can easily convert DVD and video to all the popular formats: MP4, H.264, AVI, MP3, WMV, WMA, FLV, MKV, MPEG-1, MPEG-2, 3GP, 3GPP, VOB, DivX, Mov, RM, RMVB, M4A, AAC, WAV, etc
And transfer your iPod songs and videos to your computer easily.
6:["$","$4",null,{"fallback":[[["$","link","css:/assets/_layout-BzYdn0f6.css",{"rel":"stylesheet","precedence":"vite-rsc/importer-resources","href":"/assets/_layout-BzYdn0f6.css","data-rsc-css-href":"/assets/_layout-BzYdn0f6.css"}],"$undefined"],["$","div",null,{"className":"flex justify-center items-center p-8","children":["$","div",null,{"className":"animate-spin rounded-full h-8 w-8 border-b-2 border-indigo-600"}]}]],"children":["$","div",null,{"className":"bg-white/95 mt-0.5 py-6 sm:py-12","children":["$","article",null,{"className":"mx-auto w-full max-w-2xl format format-sm sm:format-base lg:format-lg format-blue dark:format-invert","children":[["$","header",null,{"className":"mb-4 lg:mb-6 not-format","children":[["$","h1",null,{"className":"mb-4 text-3xl font-extrabold leading-tight text-gray-900 lg:mb-6 lg:text-4xl dark:text-white","children":"How to Put DVD/Video on iPod, PSP, Computer, Zune, Xbox (Mac/Windows)"}],["$","address",null,{"className":"flex items-center mb-6 not-italic","children":["$","div",null,{"className":"inline-flex items-center text-sm text-gray-900 dark:text-white","children":[["$","img",null,{"className":"mr-3 w-8 h-8 rounded-full","src":"$8","alt":"ailisaone"}],["$","a",null,{"href":"/author/ailisaone_73462714466710","rel":"author","className":"font-bold capitalize hover:underline dark:text-white","children":"ailisaone"}],["$","span",null,{"className":"mx-1 text-md text-gray-400 dark:text-gray-500","children":"·"}],["$","span",null,{"className":"inline-flex items-center ml-1 text-gray-500 dark:text-gray-400","children":"4 min read"}],["$","span",null,{"className":"mx-1 text-md text-gray-400 dark:text-gray-500","children":"·"}],["$","time",null,{"dateTime":"Thu Feb 05 2009","className":"text-gray-500 dark:text-gray-400","children":"Feb 5, 2009"}],[["$","span",null,{"className":"mx-1 text-md text-gray-400 dark:text-gray-500","children":"·"}],["$","a","tips-and-tricks",{"href":"/t/tips-and-tricks","className":"capitalize text-sm text-gray-500 dark:text-gray-400 hover:text-gray-600","children":"tips & tricks"}]]]}]}]]}],["$","div",null,{"className":"lead prose mt-4 text-lg leading-8 text-gray-600","children":["$","div",null,{"dangerouslySetInnerHTML":{"__html":"$9"}}]}],"$La","$Lb"]}]}]}]
c:T63b,M12.315 2c2.43 0 2.784.013 3.808.06 1.064.049 1.791.218 2.427.465a4.902 4.902 0 011.772 1.153 4.902 4.902 0 011.153 1.772c.247.636.416 1.363.465 2.427.048 1.067.06 1.407.06 4.123v.08c0 2.643-.012 2.987-.06 4.043-.049 1.064-.218 1.791-.465 2.427a4.902 4.902 0 01-1.153 1.772 4.902 4.902 0 01-1.772 1.153c-.636.247-1.363.416-2.427.465-1.067.048-1.407.06-4.123.06h-.08c-2.643 0-2.987-.012-4.043-.06-1.064-.049-1.791-.218-2.427-.465a4.902 4.902 0 01-1.772-1.153 4.902 4.902 0 01-1.153-1.772c-.247-.636-.416-1.363-.465-2.427-.047-1.024-.06-1.379-.06-3.808v-.63c0-2.43.013-2.784.06-3.808.049-1.064.218-1.791.465-2.427a4.902 4.902 0 011.153-1.772A4.902 4.902 0 015.45 2.525c.636-.247 1.363-.416 2.427-.465C8.901 2.013 9.256 2 11.685 2h.63zm-.081 1.802h-.468c-2.456 0-2.784.011-3.807.058-.975.045-1.504.207-1.857.344-.467.182-.8.398-1.15.748-.35.35-.566.683-.748 1.15-.137.353-.3.882-.344 1.857-.047 1.023-.058 1.351-.058 3.807v.468c0 2.456.011 2.784.058 3.807.045.975.207 1.504.344 1.857.182.466.399.8.748 1.15.35.35.683.566 1.15.748.353.137.882.3 1.857.344 1.054.048 1.37.058 4.041.058h.08c2.597 0 2.917-.01 3.96-.058.976-.045 1.505-.207 1.858-.344.466-.182.8-.398 1.15-.748.35-.35.566-.683.748-1.15.137-.353.3-.882.344-1.857.048-1.055.058-1.37.058-4.041v-.08c0-2.597-.01-2.917-.058-3.96-.045-.976-.207-1.505-.344-1.858a3.097 3.097 0 00-.748-1.15 3.098 3.098 0 00-1.15-.748c-.353-.137-.882-.3-1.857-.344-1.023-.047-1.351-.058-3.807-.058zM12 6.865a5.135 5.135 0 110 10.27 5.135 5.135 0 010-10.27zm0 1.802a3.333 3.333 0 100 6.666 3.333 3.333 0 000-6.666zm5.338-3.205a1.2 1.2 0 110 2.4 1.2 1.2 0 010-2.4z7:["$","footer",null,{"className":"bg-gray-900 dark:bg-gray-900","children":["$","div",null,{"className":"mx-auto max-w-7xl px-6 py-4.5 md:flex md:items-center md:justify-between lg:px-8","children":[["$","div",null,{"className":"flex justify-center space-x-6 md:order-2","children":[["$","a","Facebook",{"href":"https://facebook.com/gleeztech","target":"_blank","rel":"noopener noreferrer","className":"text-gray-400 hover:text-gray-500","children":[["$","span",null,{"className":"sr-only","children":"Facebook"}],["$","svg",null,{"className":"h-6 w-6","fill":"currentColor","viewBox":"0 0 24 24","aria-hidden":"true","children":["$","path",null,{"fillRule":"evenodd","d":"M22 12c0-5.523-4.477-10-10-10S2 6.477 2 12c0 4.991 3.657 9.128 8.438 9.878v-6.987h-2.54V12h2.54V9.797c0-2.506 1.492-3.89 3.777-3.89 1.094 0 2.238.195 2.238.195v2.46h-1.26c-1.243 0-1.63.771-1.63 1.562V12h2.773l-.443 2.89h-2.33v6.988C18.343 21.128 22 16.991 22 12z","clipRule":"evenodd"}]}]]}],["$","a","Instagram",{"href":"https://instagram.com/gleeztech","target":"_blank","rel":"noopener noreferrer","className":"text-gray-400 hover:text-gray-500","children":[["$","span",null,{"className":"sr-only","children":"Instagram"}],["$","svg",null,{"className":"h-6 w-6","fill":"currentColor","viewBox":"0 0 24 24","aria-hidden":"true","children":["$","path",null,{"fillRule":"evenodd","d":"$c","clipRule":"evenodd"}]}]]}],["$","a","X",{"href":"https://x.com/gleeztech","target":"_blank","rel":"noopener noreferrer","className":"text-gray-400 hover:text-gray-500","children":[["$","span",null,{"className":"sr-only","children":"X"}],["$","svg",null,{"className":"h-6 w-6","fill":"currentColor","viewBox":"0 0 24 24","aria-hidden":"true","children":["$","path",null,{"d":"M13.6823 10.6218L20.2391 3H18.6854L12.9921 9.61788L8.44486 3H3.2002L10.0765 13.0074L3.2002 21H4.75404L10.7663 14.0113L15.5685 21H20.8131L13.6819 10.6218H13.6823ZM11.5541 13.0956L10.8574 12.0991L5.31391 4.16971H7.70053L12.1742 10.5689L12.8709 11.5655L18.6861 19.8835H16.2995L11.5541 13.096V13.0956Z"}]}]]}],"$Ld"]}],"$Le"]}]}]
a:null
b:["$","$4",null,{"fallback":["$","div",null,{"className":"comments-skeleton","children":[["$","div",null,{"className":"h-6 bg-gray-200 rounded w-32 mb-4 animate-pulse"}],["$","div",null,{"className":"space-y-3","children":[["$","div","1",{"className":"h-16 bg-gray-100 rounded animate-pulse"}],["$","div","2",{"className":"h-16 bg-gray-100 rounded animate-pulse"}],["$","div","3",{"className":"h-16 bg-gray-100 rounded animate-pulse"}]]}]]}],"children":"$Lf"}]
d:["$","a","GitHub",{"href":"https://github.com/gleez","target":"_blank","rel":"noopener noreferrer","className":"text-gray-400 hover:text-gray-500","children":[["$","span",null,{"className":"sr-only","children":"GitHub"}],["$","svg",null,{"className":"h-6 w-6","fill":"currentColor","viewBox":"0 0 24 24","aria-hidden":"true","children":["$","path",null,{"fillRule":"evenodd","d":"M12 2C6.477 2 2 6.484 2 12.017c0 4.425 2.865 8.18 6.839 9.504.5.092.682-.217.682-.483 0-.237-.008-.868-.013-1.703-2.782.605-3.369-1.343-3.369-1.343-.454-1.158-1.11-1.466-1.11-1.466-.908-.62.069-.608.069-.608 1.003.07 1.531 1.032 1.531 1.032.892 1.53 2.341 1.088 2.91.832.092-.647.35-1.088.636-1.338-2.22-.253-4.555-1.113-4.555-4.951 0-1.093.39-1.988 1.029-2.688-.103-.253-.446-1.272.098-2.65 0 0 .84-.27 2.75 1.026A9.564 9.564 0 0112 6.844c.85.004 1.705.115 2.504.337 1.909-1.296 2.747-1.027 2.747-1.027.546 1.379.202 2.398.1 2.651.64.7 1.028 1.595 1.028 2.688 0 3.848-2.339 4.695-4.566 4.943.359.309.678.92.678 1.855 0 1.338-.012 2.419-.012 2.747 0 .268.18.58.688.482A10.019 10.019 0 0022 12.017C22 6.484 17.522 2 12 2z","clipRule":"evenodd"}]}]]}]
e:["$","div",null,{"className":"mt-8 md:order-1 md:mt-0","children":["$","p",null,{"className":"text-sm leading-5 text-gray-400","children":["© 2005 - ",2026," Gleez Inc. All rights reserved."]}]}]
10:T40f,data:image/svg+xml;utf8,%3Csvg%20width%3D%2232%22%20height%3D%2232%22%20viewBox%3D%220%200%2032%2032%22%20%0A%20%20%20%20%20%20%20%20%20xmlns%3D%22http%3A%2F%2Fwww.w3.org%2F2000%2Fsvg%22%20role%3D%22img%22%20aria-label%3D%22Avatar%20for%20Guest%22%3E%0A%20%20%20%20%20%20%3Crect%20width%3D%22100%25%22%20height%3D%22100%25%22%20fill%3D%22hsl(280%2C%2080%25%2C%2050%25)%22%20rx%3D%223.2%22%20%2F%3E%0A%20%20%20%20%20%20%3Ctext%20x%3D%2250%25%22%20y%3D%2250%25%22%20%0A%20%20%20%20%20%20%20%20%20%20%20%20font-family%3D%22sans-serif%22%20%0A%20%20%20%20%20%20%20%20%20%20%20%20font-size%3D%2212.8%22%20%0A%20%20%20%20%20%20%20%20%20%20%20%20font-weight%3D%22bold%22%20%0A%20%20%20%20%20%20%20%20%20%20%20%20fill%3D%22%23FFFFFF%22%20%0A%20%20%20%20%20%20%20%20%20%20%20%20text-anchor%3D%22middle%22%20%0A%20%20%20%20%20%20%20%20%20%20%20%20dominant-baseline%3D%22central%22%0A%20%20%20%20%20%20%20%20%20%20%20%20style%3D%22user-select%3A%20none%3B%22%3E%0A%20%20%20%20%20%20%20%20G%0A%20%20%20%20%20%20%3C%2Ftext%3E%0A%20%20%20%20%3C%2Fsvg%3E11:T417,data:image/svg+xml;utf8,%3Csvg%20width%3D%2232%22%20height%3D%2232%22%20viewBox%3D%220%200%2032%2032%22%20%0A%20%20%20%20%20%20%20%20%20xmlns%3D%22http%3A%2F%2Fwww.w3.org%2F2000%2Fsvg%22%20role%3D%22img%22%20aria-label%3D%22Avatar%20for%20tany%20angel%22%3E%0A%20%20%20%20%20%20%3Crect%20width%3D%22100%25%22%20height%3D%22100%25%22%20fill%3D%22hsl(159%2C%2061%25%2C%2041%25)%22%20rx%3D%223.2%22%20%2F%3E%0A%20%20%20%20%20%20%3Ctext%20x%3D%2250%25%22%20y%3D%2250%25%22%20%0A%20%20%20%20%20%20%20%20%20%20%20%20font-family%3D%22sans-serif%22%20%0A%20%20%20%20%20%20%20%20%20%20%20%20font-size%3D%2212.8%22%20%0A%20%20%20%20%20%20%20%20%20%20%20%20font-weight%3D%22bold%22%20%0A%20%20%20%20%20%20%20%20%20%20%20%20fill%3D%22%23FFFFFF%22%20%0A%20%20%20%20%20%20%20%20%20%20%20%20text-anchor%3D%22middle%22%20%0A%20%20%20%20%20%20%20%20%20%20%20%20dominant-baseline%3D%22central%22%0A%20%20%20%20%20%20%20%20%20%20%20%20style%3D%22user-select%3A%20none%3B%22%3E%0A%20%20%20%20%20%20%20%20TA%0A%20%20%20%20%20%20%3C%2Ftext%3E%0A%20%20%20%20%3C%2Fsvg%3Ef:["$","div",null,{"className":"mt-8","children":[["$","h3",null,{"className":"text-xl font-semibold mb-4","children":["Voices (",25,")"]}],["$","div",null,{"className":"space-y-6","children":[[["$","div","78837782151574",{"className":"border-l-4 border-gray-200 pl-4","children":[["$","div",null,{"className":"flex items-center gap-2 mb-2","children":["$","address",null,{"className":"flex items-center mb-6 not-italic","children":["$","div",null,{"className":"inline-flex items-center text-sm text-gray-900 dark:text-white","children":[["$","img",null,{"className":"mr-3 w-8 h-8 rounded-full","src":"$10","alt":"Guest"}],["$","a",null,{"href":"/author/guest_73325980156310","rel":"author","className":"font-bold capitalize hover:underline dark:text-white","children":"Guest"}],["$","span",null,{"className":"mx-1 text-md text-gray-400 dark:text-gray-500","children":"·"}],"$undefined",["$","span",null,{"className":"mx-1 text-md text-gray-400 dark:text-gray-500","children":"·"}],["$","time",null,{"dateTime":"Sun Aug 30 2009","className":"text-gray-500 dark:text-gray-400","children":"Aug 30, 2009"}],"$undefined"]}]}]}],["$","p",null,{"className":"text-gray-700","children":"good tool and it is really: good tool and it is really easy to use. you can first have a free trial"}],["$","div",null,{"className":"flex items-center mt-4 space-x-4","children":["$","button",null,{"type":"button","className":"flex items-center font-medium text-sm text-gray-500 hover:underline dark:text-gray-400","children":[["$","svg",null,{"className":"mr-1.5 w-3 h-3","aria-hidden":"true","xmlns":"http://www.w3.org/2000/svg","fill":"currentColor","viewBox":"0 0 20 18","children":["$","path",null,{"d":"M18 0H2a2 2 0 0 0-2 2v9a2 2 0 0 0 2 2h2v4a1 1 0 0 0 1.707.707L10.414 13H18a2 2 0 0 0 2-2V2a2 2 0 0 0-2-2Zm-5 4h2a1 1 0 1 1 0 2h-2a1 1 0 1 1 0-2ZM5 4h5a1 1 0 1 1 0 2H5a1 1 0 0 1 0-2Zm2 5H5a1 1 0 0 1 0-2h2a1 1 0 0 1 0 2Zm9 0h-6a1 1 0 0 1 0-2h6a1 1 0 1 1 0 2Z"}]}],"Reply"]}]}]]}],["$","div","78811945238934",{"className":"border-l-4 border-gray-200 pl-4","children":[["$","div",null,{"className":"flex items-center gap-2 mb-2","children":["$","address",null,{"className":"flex items-center mb-6 not-italic","children":["$","div",null,{"className":"inline-flex items-center text-sm text-gray-900 dark:text-white","children":[["$","img",null,{"className":"mr-3 w-8 h-8 rounded-full","src":"$11","alt":"tany angel"}],"$L12","$L13","$undefined","$L14","$L15","$undefined"]}]}]}],"$L16","$L17"]}],"$L18","$L19","$L1a"],"$L1b"]}]]}]
1f:I["1715fab9d5d1",[],"default",1]
12:["$","a",null,{"href":"/author/tany_angel_73524001636758","rel":"author","className":"font-bold capitalize hover:underline dark:text-white","children":"tany angel"}]
13:["$","span",null,{"className":"mx-1 text-md text-gray-400 dark:text-gray-500","children":"·"}]
14:["$","span",null,{"className":"mx-1 text-md text-gray-400 dark:text-gray-500","children":"·"}]
15:["$","time",null,{"dateTime":"Tue Aug 11 2009","className":"text-gray-500 dark:text-gray-400","children":"Aug 11, 2009"}]
16:["$","p",null,{"className":"text-gray-700","children":"More and more people have: More and more people have their own Camcorder to record their life, family parties and something important to them."}]
17:["$","div",null,{"className":"flex items-center mt-4 space-x-4","children":["$","button",null,{"type":"button","className":"flex items-center font-medium text-sm text-gray-500 hover:underline dark:text-gray-400","children":[["$","svg",null,{"className":"mr-1.5 w-3 h-3","aria-hidden":"true","xmlns":"http://www.w3.org/2000/svg","fill":"currentColor","viewBox":"0 0 20 18","children":["$","path",null,{"d":"M18 0H2a2 2 0 0 0-2 2v9a2 2 0 0 0 2 2h2v4a1 1 0 0 0 1.707.707L10.414 13H18a2 2 0 0 0 2-2V2a2 2 0 0 0-2-2Zm-5 4h2a1 1 0 1 1 0 2h-2a1 1 0 1 1 0-2ZM5 4h5a1 1 0 1 1 0 2H5a1 1 0 0 1 0-2Zm2 5H5a1 1 0 0 1 0-2h2a1 1 0 0 1 0 2Zm9 0h-6a1 1 0 0 1 0-2h6a1 1 0 1 1 0 2Z"}]}],"Reply"]}]}]
1c:T413,data:image/svg+xml;utf8,%3Csvg%20width%3D%2232%22%20height%3D%2232%22%20viewBox%3D%220%200%2032%2032%22%20%0A%20%20%20%20%20%20%20%20%20xmlns%3D%22http%3A%2F%2Fwww.w3.org%2F2000%2Fsvg%22%20role%3D%22img%22%20aria-label%3D%22Avatar%20for%20ailisaone%22%3E%0A%20%20%20%20%20%20%3Crect%20width%3D%22100%25%22%20height%3D%22100%25%22%20fill%3D%22hsl(147%2C%2082%25%2C%2057%25)%22%20rx%3D%223.2%22%20%2F%3E%0A%20%20%20%20%20%20%3Ctext%20x%3D%2250%25%22%20y%3D%2250%25%22%20%0A%20%20%20%20%20%20%20%20%20%20%20%20font-family%3D%22sans-serif%22%20%0A%20%20%20%20%20%20%20%20%20%20%20%20font-size%3D%2212.8%22%20%0A%20%20%20%20%20%20%20%20%20%20%20%20font-weight%3D%22bold%22%20%0A%20%20%20%20%20%20%20%20%20%20%20%20fill%3D%22%23FFFFFF%22%20%0A%20%20%20%20%20%20%20%20%20%20%20%20text-anchor%3D%22middle%22%20%0A%20%20%20%20%20%20%20%20%20%20%20%20dominant-baseline%3D%22central%22%0A%20%20%20%20%20%20%20%20%20%20%20%20style%3D%22user-select%3A%20none%3B%22%3E%0A%20%20%20%20%20%20%20%20A%0A%20%20%20%20%20%20%3C%2Ftext%3E%0A%20%20%20%20%3C%2Fsvg%3E18:["$","div","78804244496790",{"className":"border-l-4 border-gray-200 pl-4","children":[["$","div",null,{"className":"flex items-center gap-2 mb-2","children":["$","address",null,{"className":"flex items-center mb-6 not-italic","children":["$","div",null,{"className":"inline-flex items-center text-sm text-gray-900 dark:text-white","children":[["$","img",null,{"className":"mr-3 w-8 h-8 rounded-full","src":"$1c","alt":"ailisaone"}],["$","a",null,{"href":"/author/ailisaone_73462714466710","rel":"author","className":"font-bold capitalize hover:underline dark:text-white","children":"ailisaone"}],["$","span",null,{"className":"mx-1 text-md text-gray-400 dark:text-gray-500","children":"·"}],"$undefined",["$","span",null,{"className":"mx-1 text-md text-gray-400 dark:text-gray-500","children":"·"}],["$","time",null,{"dateTime":"Sun Aug 02 2009","className":"text-gray-500 dark:text-gray-400","children":"Aug 2, 2009"}],"$undefined"]}]}]}],["$","p",null,{"className":"text-gray-700","children":"nice guide thank you for: nice guide thank you for sharing. it is reall helfpul to me."}],["$","div",null,{"className":"flex items-center mt-4 space-x-4","children":["$","button",null,{"type":"button","className":"flex items-center font-medium text-sm text-gray-500 hover:underline dark:text-gray-400","children":[["$","svg",null,{"className":"mr-1.5 w-3 h-3","aria-hidden":"true","xmlns":"http://www.w3.org/2000/svg","fill":"currentColor","viewBox":"0 0 20 18","children":["$","path",null,{"d":"M18 0H2a2 2 0 0 0-2 2v9a2 2 0 0 0 2 2h2v4a1 1 0 0 0 1.707.707L10.414 13H18a2 2 0 0 0 2-2V2a2 2 0 0 0-2-2Zm-5 4h2a1 1 0 1 1 0 2h-2a1 1 0 1 1 0-2ZM5 4h5a1 1 0 1 1 0 2H5a1 1 0 0 1 0-2Zm2 5H5a1 1 0 0 1 0-2h2a1 1 0 0 1 0 2Zm9 0h-6a1 1 0 0 1 0-2h6a1 1 0 1 1 0 2Z"}]}],"Reply"]}]}]]}]
1d:T40f,data:image/svg+xml;utf8,%3Csvg%20width%3D%2232%22%20height%3D%2232%22%20viewBox%3D%220%200%2032%2032%22%20%0A%20%20%20%20%20%20%20%20%20xmlns%3D%22http%3A%2F%2Fwww.w3.org%2F2000%2Fsvg%22%20role%3D%22img%22%20aria-label%3D%22Avatar%20for%20Guest%22%3E%0A%20%20%20%20%20%20%3Crect%20width%3D%22100%25%22%20height%3D%22100%25%22%20fill%3D%22hsl(280%2C%2080%25%2C%2050%25)%22%20rx%3D%223.2%22%20%2F%3E%0A%20%20%20%20%20%20%3Ctext%20x%3D%2250%25%22%20y%3D%2250%25%22%20%0A%20%20%20%20%20%20%20%20%20%20%20%20font-family%3D%22sans-serif%22%20%0A%20%20%20%20%20%20%20%20%20%20%20%20font-size%3D%2212.8%22%20%0A%20%20%20%20%20%20%20%20%20%20%20%20font-weight%3D%22bold%22%20%0A%20%20%20%20%20%20%20%20%20%20%20%20fill%3D%22%23FFFFFF%22%20%0A%20%20%20%20%20%20%20%20%20%20%20%20text-anchor%3D%22middle%22%20%0A%20%20%20%20%20%20%20%20%20%20%20%20dominant-baseline%3D%22central%22%0A%20%20%20%20%20%20%20%20%20%20%20%20style%3D%22user-select%3A%20none%3B%22%3E%0A%20%20%20%20%20%20%20%20G%0A%20%20%20%20%20%20%3C%2Ftext%3E%0A%20%20%20%20%3C%2Fsvg%3E19:["$","div","78793104425366",{"className":"border-l-4 border-gray-200 pl-4","children":[["$","div",null,{"className":"flex items-center gap-2 mb-2","children":["$","address",null,{"className":"flex items-center mb-6 not-italic","children":["$","div",null,{"className":"inline-flex items-center text-sm text-gray-900 dark:text-white","children":[["$","img",null,{"className":"mr-3 w-8 h-8 rounded-full","src":"$1d","alt":"Guest"}],["$","a",null,{"href":"/author/guest_73325980156310","rel":"author","className":"font-bold capitalize hover:underline dark:text-white","children":"Guest"}],["$","span",null,{"className":"mx-1 text-md text-gray-400 dark:text-gray-500","children":"·"}],"$undefined",["$","span",null,{"className":"mx-1 text-md text-gray-400 dark:text-gray-500","children":"·"}],["$","time",null,{"dateTime":"Tue Jul 28 2009","className":"text-gray-500 dark:text-gray-400","children":"Jul 28, 2009"}],"$undefined"]}]}]}],["$","p",null,{"className":"text-gray-700","children":"well, i like this tool: well, i like this tool "}],["$","div",null,{"className":"flex items-center mt-4 space-x-4","children":["$","button",null,{"type":"button","className":"flex items-center font-medium text-sm text-gray-500 hover:underline dark:text-gray-400","children":[["$","svg",null,{"className":"mr-1.5 w-3 h-3","aria-hidden":"true","xmlns":"http://www.w3.org/2000/svg","fill":"currentColor","viewBox":"0 0 20 18","children":["$","path",null,{"d":"M18 0H2a2 2 0 0 0-2 2v9a2 2 0 0 0 2 2h2v4a1 1 0 0 0 1.707.707L10.414 13H18a2 2 0 0 0 2-2V2a2 2 0 0 0-2-2Zm-5 4h2a1 1 0 1 1 0 2h-2a1 1 0 1 1 0-2ZM5 4h5a1 1 0 1 1 0 2H5a1 1 0 0 1 0-2Zm2 5H5a1 1 0 0 1 0-2h2a1 1 0 0 1 0 2Zm9 0h-6a1 1 0 0 1 0-2h6a1 1 0 1 1 0 2Z"}]}],"Reply"]}]}]]}]
1e:T40f,data:image/svg+xml;utf8,%3Csvg%20width%3D%2232%22%20height%3D%2232%22%20viewBox%3D%220%200%2032%2032%22%20%0A%20%20%20%20%20%20%20%20%20xmlns%3D%22http%3A%2F%2Fwww.w3.org%2F2000%2Fsvg%22%20role%3D%22img%22%20aria-label%3D%22Avatar%20for%20Guest%22%3E%0A%20%20%20%20%20%20%3Crect%20width%3D%22100%25%22%20height%3D%22100%25%22%20fill%3D%22hsl(280%2C%2080%25%2C%2050%25)%22%20rx%3D%223.2%22%20%2F%3E%0A%20%20%20%20%20%20%3Ctext%20x%3D%2250%25%22%20y%3D%2250%25%22%20%0A%20%20%20%20%20%20%20%20%20%20%20%20font-family%3D%22sans-serif%22%20%0A%20%20%20%20%20%20%20%20%20%20%20%20font-size%3D%2212.8%22%20%0A%20%20%20%20%20%20%20%20%20%20%20%20font-weight%3D%22bold%22%20%0A%20%20%20%20%20%20%20%20%20%20%20%20fill%3D%22%23FFFFFF%22%20%0A%20%20%20%20%20%20%20%20%20%20%20%20text-anchor%3D%22middle%22%20%0A%20%20%20%20%20%20%20%20%20%20%20%20dominant-baseline%3D%22central%22%0A%20%20%20%20%20%20%20%20%20%20%20%20style%3D%22user-select%3A%20none%3B%22%3E%0A%20%20%20%20%20%20%20%20G%0A%20%20%20%20%20%20%3C%2Ftext%3E%0A%20%20%20%20%3C%2Fsvg%3E1a:["$","div","78789161779606",{"className":"border-l-4 border-gray-200 pl-4","children":[["$","div",null,{"className":"flex items-center gap-2 mb-2","children":["$","address",null,{"className":"flex items-center mb-6 not-italic","children":["$","div",null,{"className":"inline-flex items-center text-sm text-gray-900 dark:text-white","children":[["$","img",null,{"className":"mr-3 w-8 h-8 rounded-full","src":"$1e","alt":"Guest"}],["$","a",null,{"href":"/author/guest_73325980156310","rel":"author","className":"font-bold capitalize hover:underline dark:text-white","children":"Guest"}],["$","span",null,{"className":"mx-1 text-md text-gray-400 dark:text-gray-500","children":"·"}],"$undefined",["$","span",null,{"className":"mx-1 text-md text-gray-400 dark:text-gray-500","children":"·"}],["$","time",null,{"dateTime":"Thu Jul 23 2009","className":"text-gray-500 dark:text-gray-400","children":"Jul 23, 2009"}],"$undefined"]}]}]}],["$","p",null,{"className":"text-gray-700","children":"I bought an iPhone and love: I bought an iPhone and love all its features"}],["$","div",null,{"className":"flex items-center mt-4 space-x-4","children":["$","button",null,{"type":"button","className":"flex items-center font-medium text-sm text-gray-500 hover:underline dark:text-gray-400","children":[["$","svg",null,{"className":"mr-1.5 w-3 h-3","aria-hidden":"true","xmlns":"http://www.w3.org/2000/svg","fill":"currentColor","viewBox":"0 0 20 18","children":["$","path",null,{"d":"M18 0H2a2 2 0 0 0-2 2v9a2 2 0 0 0 2 2h2v4a1 1 0 0 0 1.707.707L10.414 13H18a2 2 0 0 0 2-2V2a2 2 0 0 0-2-2Zm-5 4h2a1 1 0 1 1 0 2h-2a1 1 0 1 1 0-2ZM5 4h5a1 1 0 1 1 0 2H5a1 1 0 0 1 0-2Zm2 5H5a1 1 0 0 1 0-2h2a1 1 0 0 1 0 2Zm9 0h-6a1 1 0 0 1 0-2h6a1 1 0 1 1 0 2Z"}]}],"Reply"]}]}]]}]
1b:["$","$L1f",null,{"postId":"76293903221142","endCursor":"78789161779606","initialComments":[{"id":"78837782151574","content":"good tool and it is really: good tool and it is really easy to use. you can first have a free trial","contentHtml":"good tool and it is really: good tool and it is really easy to use. you can first have a free trial","metadata":null,"isApproved":true,"createdAt":"$D2009-08-30T01:45:56.000Z","updatedAt":"$D2009-08-30T01:45:56.000Z","authorId":"73325980156310","postId":"76293903221142","parentId":null,"author":{"id":"73325980156310","nickName":"Guest","username":"guest_73325980156310","email":"guest@example.com","role":"USER","isAdmin":false,"image":null,"metadata":null,"salt":null,"publicKey":null,"lastLogin":null,"failedAttempts":0,"lockedUntil":null,"recoveryPhraseHash":null,"recoveryCreatedAt":null,"createdAt":"$D2005-01-01T00:00:00.000Z","updatedAt":"$D2005-01-01T00:00:00.000Z"}},{"id":"78811945238934","content":"More and more people have: More and more people have their own Camcorder to record their life, family parties and something important to them.","contentHtml":"More and more people have: More and more people have their own Camcorder to record their life, family parties and something important to them.","metadata":null,"isApproved":true,"createdAt":"$D2009-08-11T11:12:27.000Z","updatedAt":"$D2009-08-11T11:12:27.000Z","authorId":"73524001636758","postId":"76293903221142","parentId":null,"author":{"id":"73524001636758","nickName":"tany angel","username":"tany_angel_73524001636758","email":"angltany@gmail.com","role":"USER","isAdmin":false,"image":null,"metadata":null,"salt":null,"publicKey":null,"lastLogin":null,"failedAttempts":0,"lockedUntil":null,"recoveryPhraseHash":null,"recoveryCreatedAt":null,"createdAt":"$D2009-08-11T07:05:35.000Z","updatedAt":"$D2009-08-12T00:38:04.000Z"}},{"id":"78804244496790","content":"nice guide thank you for: nice guide thank you for sharing. it is reall helfpul to me.","contentHtml":"nice guide thank you for: nice guide thank you for sharing. it is reall helfpul to me.","metadata":null,"isApproved":true,"createdAt":"$D2009-08-02T03:30:57.000Z","updatedAt":"$D2009-08-02T03:30:57.000Z","authorId":"73462714466710","postId":"76293903221142","parentId":null,"author":{"id":"73462714466710","nickName":"ailisaone","username":"ailisaone_73462714466710","email":"ailisaone@gmail.com","role":"USER","isAdmin":false,"image":null,"metadata":null,"salt":null,"publicKey":null,"lastLogin":null,"failedAttempts":0,"lockedUntil":null,"recoveryPhraseHash":null,"recoveryCreatedAt":null,"createdAt":"$D2008-10-07T09:42:14.000Z","updatedAt":"$D2009-08-29T03:03:08.000Z"}},{"id":"78793104425366","content":"well, i like this tool: well, i like this tool ","contentHtml":"well, i like this tool: well, i like this tool ","metadata":null,"isApproved":true,"createdAt":"$D2009-07-28T11:24:40.000Z","updatedAt":"$D2009-07-28T11:24:40.000Z","authorId":"73325980156310","postId":"76293903221142","parentId":null,"author":{"id":"73325980156310","nickName":"Guest","username":"guest_73325980156310","email":"guest@example.com","role":"USER","isAdmin":false,"image":null,"metadata":null,"salt":null,"publicKey":null,"lastLogin":null,"failedAttempts":0,"lockedUntil":null,"recoveryPhraseHash":null,"recoveryCreatedAt":null,"createdAt":"$D2005-01-01T00:00:00.000Z","updatedAt":"$D2005-01-01T00:00:00.000Z"}},{"id":"78789161779606","content":"I bought an iPhone and love: I bought an iPhone and love all its features","contentHtml":"I bought an iPhone and love: I bought an iPhone and love all its features","metadata":null,"isApproved":true,"createdAt":"$D2009-07-23T11:10:42.000Z","updatedAt":"$D2009-07-23T11:10:42.000Z","authorId":"73325980156310","postId":"76293903221142","parentId":null,"author":{"id":"73325980156310","nickName":"Guest","username":"guest_73325980156310","email":"guest@example.com","role":"USER","isAdmin":false,"image":null,"metadata":null,"salt":null,"publicKey":null,"lastLogin":null,"failedAttempts":0,"lockedUntil":null,"recoveryPhraseHash":null,"recoveryCreatedAt":null,"createdAt":"$D2005-01-01T00:00:00.000Z","updatedAt":"$D2005-01-01T00:00:00.000Z"}}]}]